CockroachDB TIL: Volume 9

This is my series of articles covering short "Today I learned" topics as I work with CockroachDB. Today, we're auditing schema change events, configure Linode Cloud Storage for CockroachDB bulk ops, and lots of DBeaver goodness.
Previous articles
Topics
- Topic 1: Capture schema change history
- Topic 2: Use Linode Object Storage for CockroachDB bulk ops
- Topic 3: Configure DBeaver for CockroachDB Serverless
- Topic 4: Configure DBeaver for multiple databases
- Topic 5: Configure DBeaver CockroachDB connection with pgpass
Topic 1: Capture schema change history
There was a question in our community Slack on capturing schema changes from a cluster. CockroachDB has a system.eventlog table that can be inspected for audit events like schema changes, cluster configuration changes, user and role changes, etc. This table is a running record of these events and by default it retains 90 days of events controlled by `server.eventlog.ttl property. This is a notable event table and not a replacement for a schema change tool, which typically persist schema change history on permanent basis. Here's a sample output from the table:
{
      "ApplicationName": "$ cockroach demo",
      "DescriptorID": 106,
      "EventType": "create_table",
      "Statement": "CREATE TABLE IF NOT EXISTS movr.public.users (id UUID NOT NULL, city VARCHAR NOT NULL, name VARCHAR NULL, address VARCHAR NULL, credit_card VARCHAR NULL, PRIMARY KEY (city, id ASC))",
      "TableName": "movr.public.users",
      "Tag": "CREATE TABLE",
      "Timestamp": 1660142974199075000,
      "User": "demo"
  }
  {
      "ApplicationName": "$ cockroach demo",
      "DescriptorID": 107,
      "EventType": "create_table",
      "Statement": "CREATE TABLE IF NOT EXISTS movr.public.vehicles (id UUID NOT NULL, city VARCHAR NOT NULL, type VARCHAR NULL, owner_id UUID NULL, creation_time TIMESTAMP NULL, status VARCHAR NULL, current_location VARCHAR NULL, ext JSONB NULL, PRIMARY KEY (city, id ASC), INDEX vehicles_auto_index_fk_city_ref_users (city, owner_id ASC))",
      "TableName": "movr.public.vehicles",
      "Tag": "CREATE TABLE",
      "Timestamp": 1660142974206742000,
      "User": "demo"
  }
The events in the table are strings but they can be quickly extrapolated as JSONB objects. I came up with the following query to focus on the Statement objects:
WITH X AS (
    SELECT jsonb_pretty(info::jsonb) AS payload
        FROM system.eventlog
    )
    SELECT payload::jsonb->'Statement' FROM x;
and here's the output:
  "CREATE DATABASE movr"
  "CREATE TABLE IF NOT EXISTS movr.public.users (id UUID NOT NULL, city VARCHAR NOT NULL, name VARCHAR NULL, address VARCHAR NULL, credit_card VARCHAR NULL, PRIMARY KEY (city, id ASC))"
  "CREATE TABLE IF NOT EXISTS movr.public.vehicles (id UUID NOT NULL, city VARCHAR NOT NULL, type VARCHAR NULL, owner_id UUID NULL, creation_time TIMESTAMP NULL, status VARCHAR NULL, current_location VARCHAR NULL, ext JSONB NULL, PRIMARY KEY (city, id ASC), INDEX vehicles_auto_index_fk_city_ref_users (city, owner_id ASC))"
  "CREATE TABLE IF NOT EXISTS movr.public.rides (id UUID NOT NULL, city VARCHAR NOT NULL, vehicle_city VARCHAR NULL, rider_id UUID NULL, vehicle_id UUID NULL, start_address VARCHAR NULL, end_address VARCHAR NULL, start_time TIMESTAMP NULL, end_time TIMESTAMP NULL, revenue DECIMAL(10,2) NULL, PRIMARY KEY (city, id ASC), INDEX rides_auto_index_fk_city_ref_users (city, rider_id ASC), INDEX rides_auto_index_fk_vehicle_city_ref_vehicles (vehicle_city, vehicle_id ASC), CONSTRAINT check_vehicle_city_city CHECK (vehicle_city = city))"
  "CREATE TABLE IF NOT EXISTS movr.public.vehicle_location_histories (city VARCHAR NOT NULL, ride_id UUID NOT NULL, \\"timestamp\\" TIMESTAMP NOT NULL, lat FLOAT8 NULL, long FLOAT8 NULL, PRIMARY KEY (city, ride_id ASC, \\"timestamp\\" ASC))"
  "CREATE TABLE IF NOT EXISTS movr.public.promo_codes (code VARCHAR NOT NULL, description VARCHAR NULL, creation_time TIMESTAMP NULL, expiration_time TIMESTAMP NULL, rules JSONB NULL, PRIMARY KEY (code ASC))"
  "CREATE TABLE IF NOT EXISTS movr.public.user_promo_codes (city VARCHAR NOT NULL, user_id UUID NOT NULL, code VARCHAR NOT NULL, \\"timestamp\\" TIMESTAMP NULL, usage_count INT8 NULL, PRIMARY KEY (city, user_id ASC, code ASC))"
  "ALTER TABLE movr.public.vehicles ADD FOREIGN KEY (city, owner_id) REFERENCES movr.public.users (city, id)"
  NULL
  "ALTER TABLE movr.public.rides ADD FOREIGN KEY (city, rider_id) REFERENCES movr.public.users (city, id)"
  NULL
  "ALTER TABLE movr.public.rides ADD FOREIGN KEY (vehicle_city, vehicle_id) REFERENCES movr.public.vehicles (city, id)"
  NULL
  "ALTER TABLE movr.public.vehicle_location_histories ADD FOREIGN KEY (city, ride_id) REFERENCES movr.public.rides (city, id)"
  NULL
  "ALTER TABLE movr.public.user_promo_codes ADD FOREIGN KEY (city, user_id) REFERENCES movr.public.users (city, id)"
  NULL
Topic 2: Use Linode Object Storage for CockroachDB bulk ops
I came across a question in our community Slack on using Linode Object Storage for bulk operations with CockroachDB. Since Linode Object Storage uses S3 compatible API, it should just work.

By the way, this tip is not something I've learned just now, I've covered this in my Minio posts 1 & 2, however, working with Linode specifically is new to me.
*Note: In my testing, with any S3 compatible services, you must pass an optional AWS_REGION and AWS_ENDPOINT parameters to make the object storage work with CockroachDB. Let's take an example backup job, let's see what happens if we omit the AWS_REGION parameter.
BACKUP INTO 's3://bucketname?AWS_ACCESS_KEY_ID=accesskeyid&AWS_SECRET_ACCESS_KEY=secret' AS OF SYSTEM TIME '-10s';
We get the following error:
ERROR: could not find s3 bucket's region: NotFound: Not Found
        status code: 404, request id: , host id:
Let's attempt again with AWS_REGION:
BACKUP INTO 's3://bucketname?AWS_ACCESS_KEY_ID=accesskeyid&AWS_SECRET_ACCESS_KEY=secret&AWS_REGION=us-east-1' AS OF SYSTEM TIME '-10s';
ERROR: failed to get s3 object: InvalidAccessKeyId: The AWS Access Key Id you provided does not exist in our records.
        status code: 403, request id: , host id:
The error can be clearer and what I recommend in that case is using the awscli utility to diagnose access to the bucket.
Let's attempt to run an ls command on the bucket:
aws s3 ls s3://bucketname
An error occurred (InvalidAccessKeyId) when calling the ListObjectsV2 operation: The AWS Access Key Id you provided does not exist in our records.
Whatdoyaknow? The error is a pass-through from the AWS CLI. Let's add the endpoint, by the way here's an article pointing to the endpoint tip.
aws s3 ls s3://bucketname --endpoint=https://us-east-1.linodeobjects.com
                           PRE 2022/
                           PRE metadata/
This worked and it shows some of the existing files I have in the bucket.
Now, let's try to run the backup job and pass the AWS_ENDPOINT parameter.
BACKUP INTO 's3://bucketname?AWS_ACCESS_KEY_ID=accesskeyid&AWS_SECRET_ACCESS_KEY=secret&AWS_REGION=us-east-1&AWS_ENDPOINT=https://us-east-1.linodeobjects.com' AS OF SYSTEM TIME '-10s';
And finally it works! Lesson for today: When in doubt, make sure the basics work.
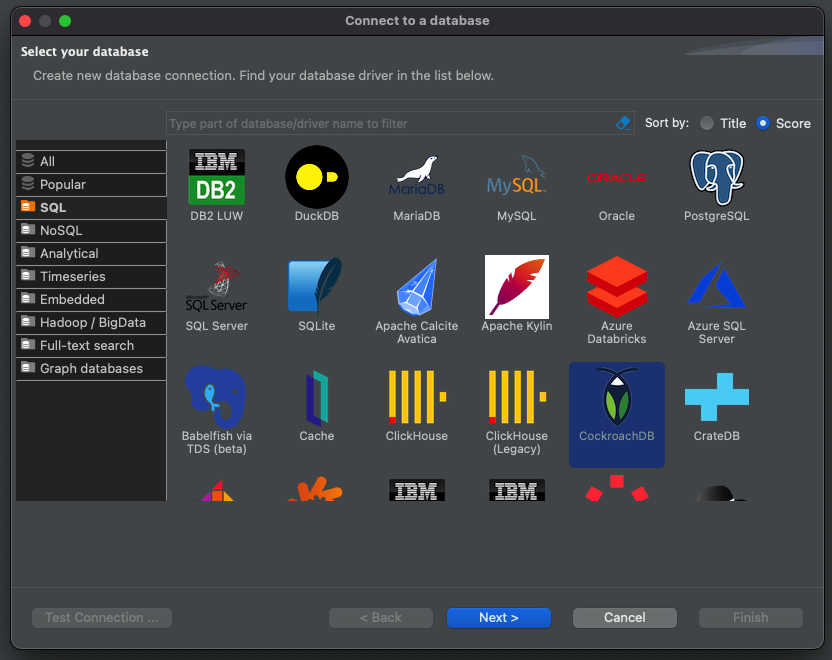
Topic 3: Configure DBeaver for CockroachDB Serverless
The other day I've stumbled onto an issue I've not seen before. I was configuring DBeaver with CockroachDB Serverless and it wouldn't work. Today, I am going to document the new method of connecting to Serverless as well as a workaround for those times when DBeaver misbehaves:
First, let's create a cluster, the optimal way to spin one up is via ccloud cli.
ccloud cluster create serverless artem-serverless
Retrieving the nearest compatible region: succeeded
Creating cluster: succeeded
Success! Created cluster
 name: artem-serverless
 id: 2490c3b4-5739-475f-ac8d-bda589d068db
 cockroach version: v22.1.6
 cloud: GCP
 plan type: SERVERLESS
 state: CREATED
 spend limit: $0.00
 regions: us-east1
ccloud cluster sql artem-serverless
Retrieving cluster info: succeeded
 Downloading cluster cert to /Users/artem/.postgresql/root.crt: succeeded
Retrieving SQL user list: succeeded
No SQL users found. Create one now?: Y
Create a new SQL user:
New username: artem
New password: ***************
Confirm password: ***************
Looking up cluster ID: succeeded
Creating SQL user: succeeded
Success! Created SQL user
 name: artem
 cluster: artem-serverless
Starting CockroachDB SQL shell...
#
# Welcome to the CockroachDB SQL shell.
# All statements must be terminated by a semicolon.
# To exit, type: \q.
#
# Server version: CockroachDB CCL v22.1.6 (x86_64-pc-linux-gnu, built 2022/08/23 17:05:04, go1.17.11) (same version as client)
# Cluster ID: 20735006-5a39-49c3-29d6-6f4c8c091e7d
#
# Enter \? for a brief introduction.
#
artem@free-tier11.gcp-us-east1.cockroachlabs.cloud:26257/defaultdb>
Now we need to configure DBeaver. Let's capture the connection parameters, we will need it next.
ccloud cluster sql artem-serverless --connection-params
Retrieving cluster info: succeeded
Connection parameters
 Database:  defaultdb
 Host:      free-tier11.gcp-us-east1.cockroachlabs.cloud
 Options:   --cluster=artem-serverless-1812
 Port:      26257
By the way, ccloud cli supports autocompletion and you can generate your autocompletion with `ccloud completion <your shell, i.e. zsh, bsh, fish, etc.>
Click next
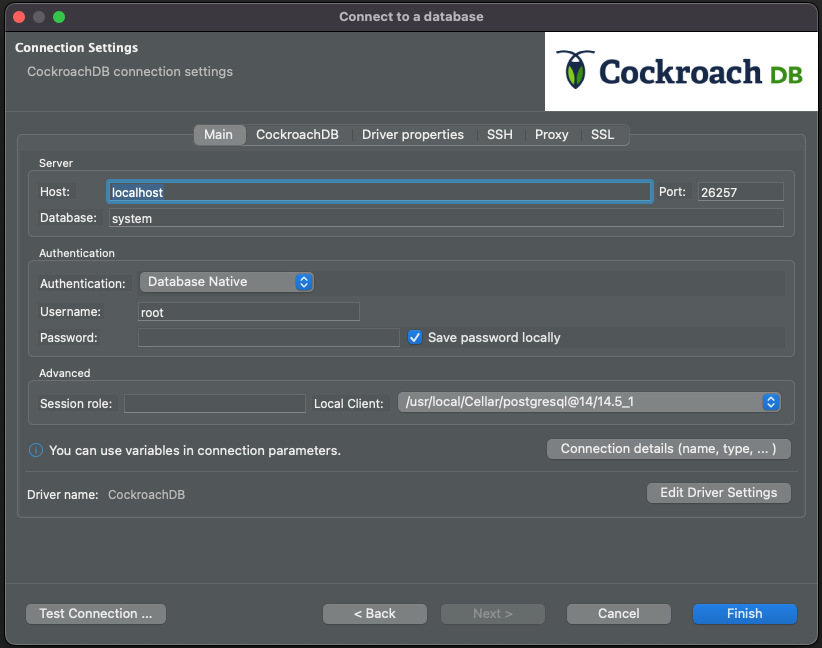
If this is your first time configuring a postgresql compatible database with DBeaver, you may need to download the Postgresql jar.
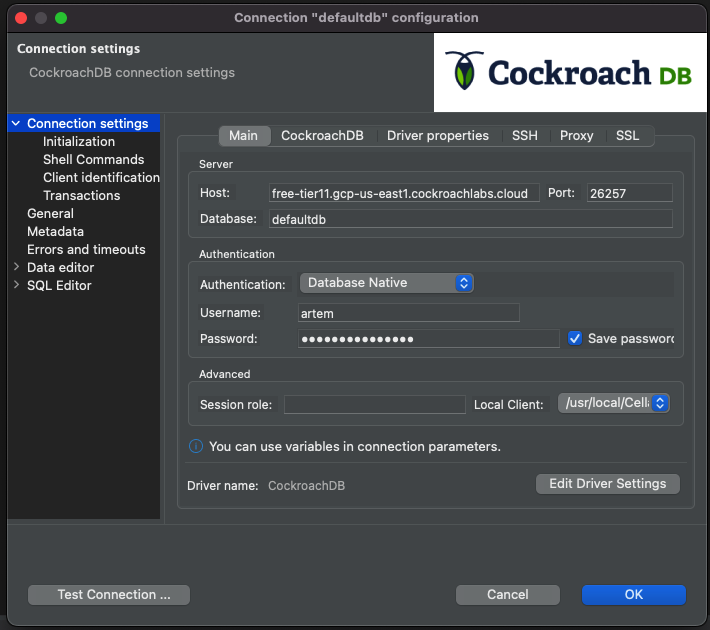
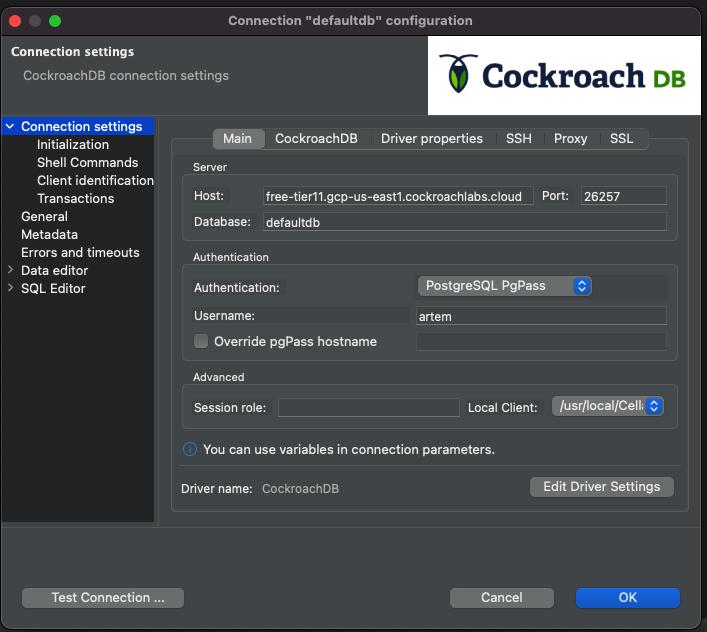
Fill out the host, database, user and password and click Test Connection
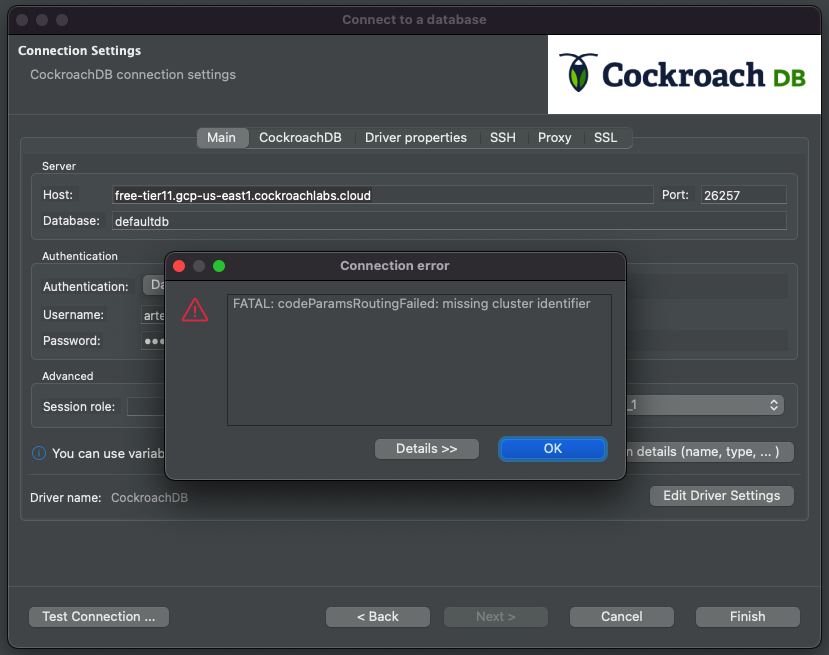
The error means we need to input a tenant cluster identifier. Historically, we've added the tenant routing number in the database text field, i.e. artem-serverless-1812.defaultdb.
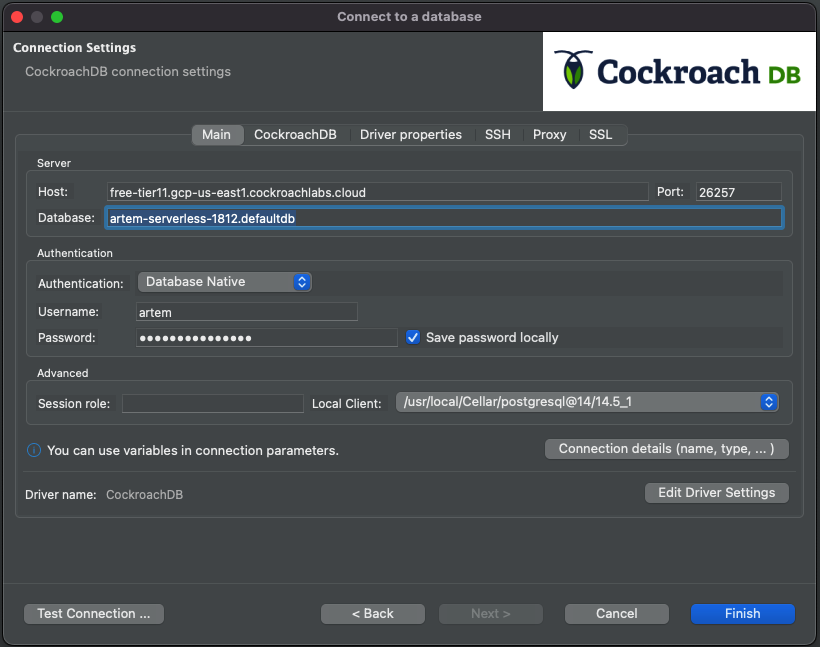
Hit Test Connection again
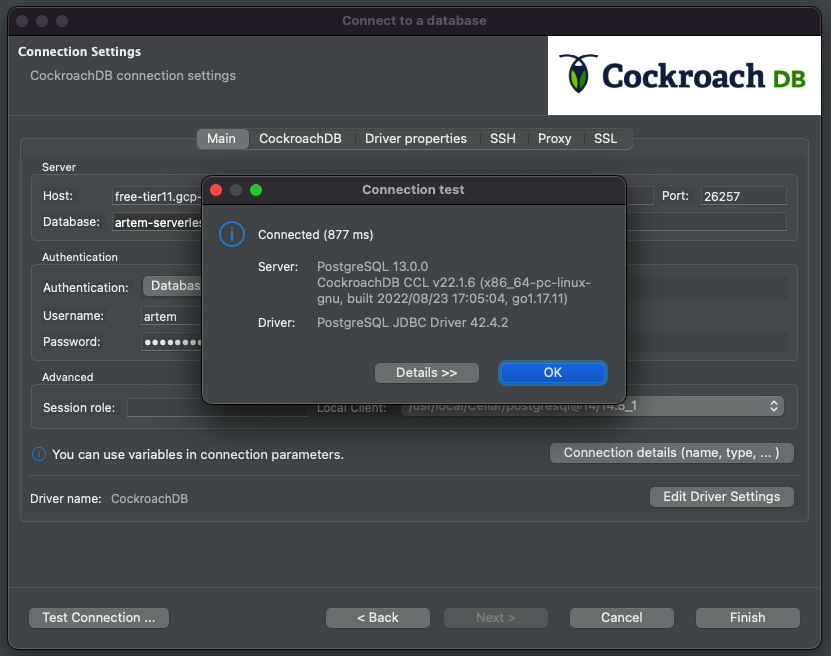
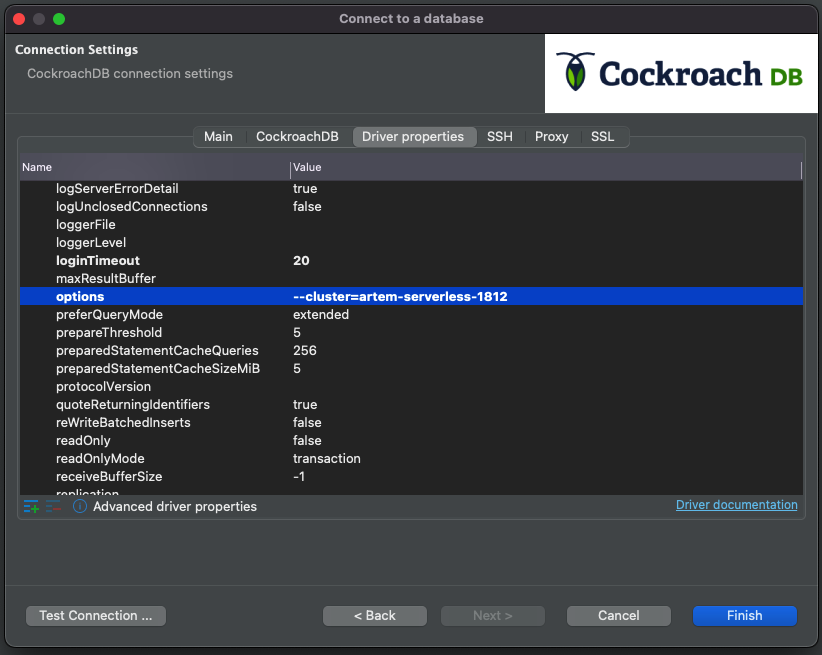
So this works as expected but there is another way to achieve the same result and is more in line with other tools and IDEs. Let's change the database back to defaultdb and navigate to the Driver Properties tab. There, look for a field named "options" and enter the parameter output you got from the ccloud output, i.e. Options: --cluster=artem-serverless-1812, leaving the Options: part out.
Click Test Connection again

We're now set and I've shown two ways to configure Serverless with DBeaver. The rest of the topic will talk about the issue I was having with DBeaver specifically as the options property was missing from the Driver Properties tab and it took me a lot of head scratching to figure out. Turns out, if you've had DBeaver for a long time and upgraded it from an old version to a new version several times, the UI can get messy and you will need to reset the metadata. By the way, the problem is not obvious as I've literally worked with a colleague of mine and having him walk through his identical version of DBeaver configure the database and he happened to have the options field present. The following article has helped me get to the bottom of it. The gist of the resolution is removing the metadata directory and resetting the workspace. So once I removed ~/Library/DBeaverData/workspace6/.metadata and restarted DBeaver, I was presented with the options field.
You're now all set and know two methods to connect to a Serverless cluster.
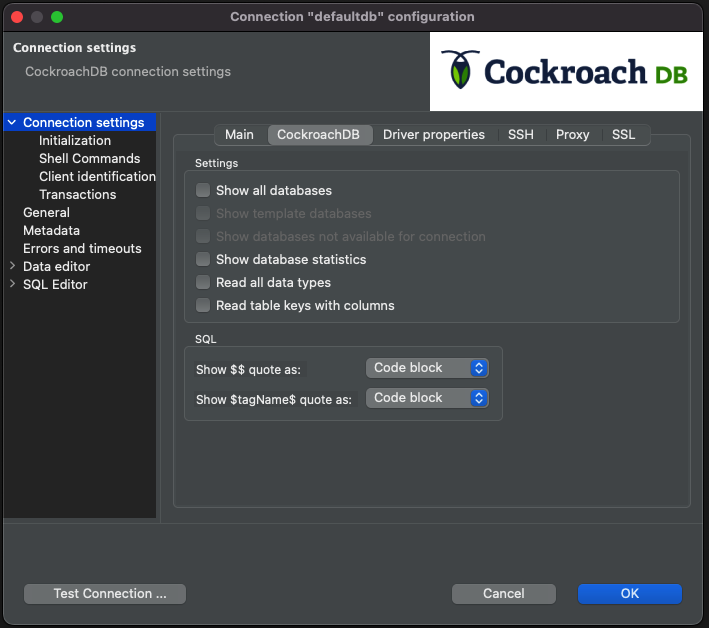
Topic 4: Configure DBeaver for multiple databases
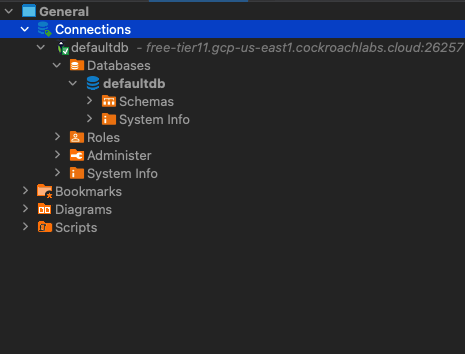
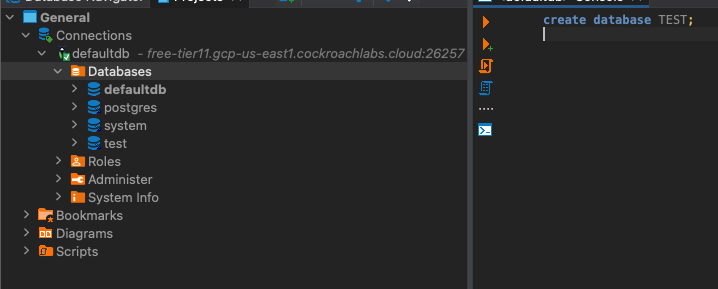
This is a new trick I've just picked up as I was figuring out the problem with the topic 3 above. Each database connection in DBeaver is database specific, notice in the previous topic we pinned the connection to defaultdb. If we were to use the project navigator in DBeaver, we'd see that the entire context is based on the defaultdb and all of the underlying attributes.
Say you want to see more than just defaultdb, you should be able to navigate across multiple databases, you can do that by editing your connection
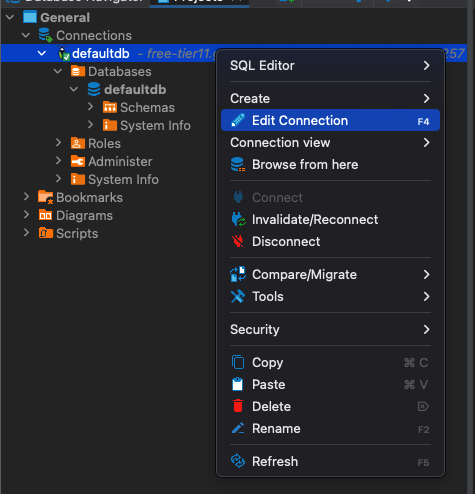
You will see a similar context to the connection configuration from the third topic, click the CockroachDB tab
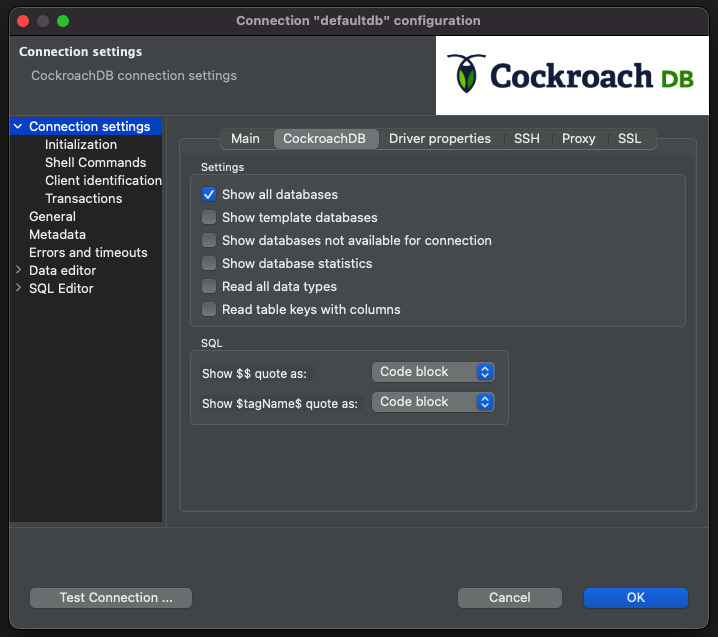
Check the box next to "Show all databases" and click "OK".
You will be prompted to re-connect
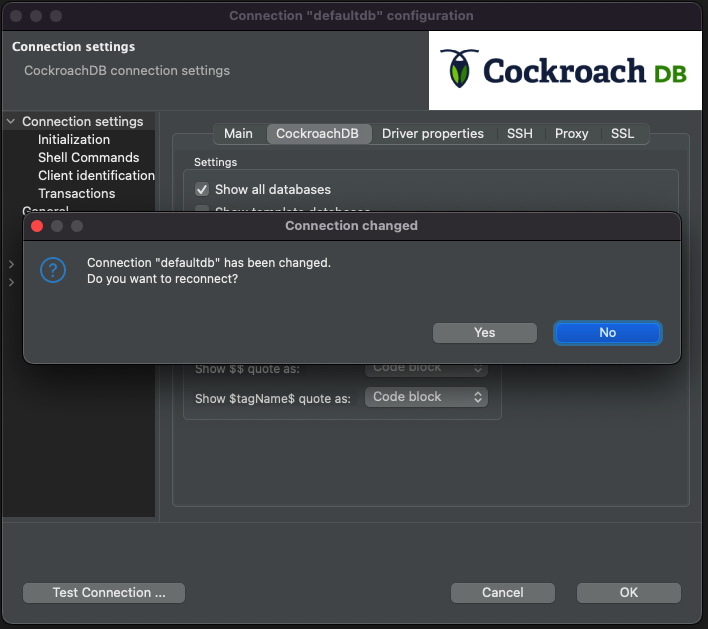
Click yes
Now you can expand the project navigator to see the rest of the databases
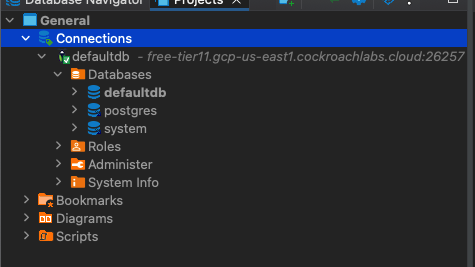
This was my biggest pet peeve and I'm glad I've found a solution. Now I can switch between databases without disconnecting and reconfiguring the connection. We can easily test it by creating another database and refreshing the navigator tab
Topic 5: Configure DBeaver CockroachDB connection with pgpass
For the last topic, I'd like to talk about another and arguably more secure method of connecting to CockroachDB Serverless via DBeaver. Recall in the third topic, we used username and password explicitly to access CockroachDB.
Starting with postgresql driver 42.3, pgpass is now supported and we've covered it multiple times. The benefits of pgpass now can be passed to IDE tools like DBeaver. You can edit your current driver settings by clicking the associated button and navigating to the "Lbraries" tab.
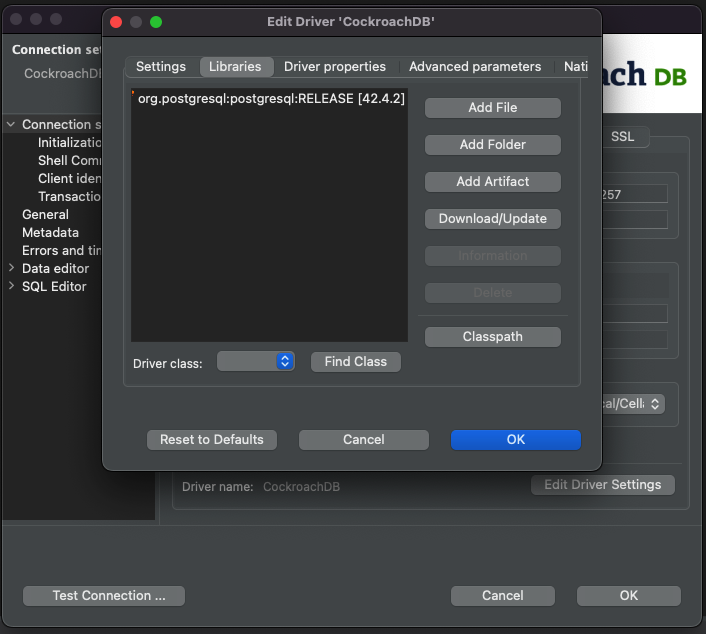
Make sure you have at least 42.3 jar installed, if not, DBeaver allows you to download it from the context menu. Once done, close the context menu and switch back to the main connection menu.
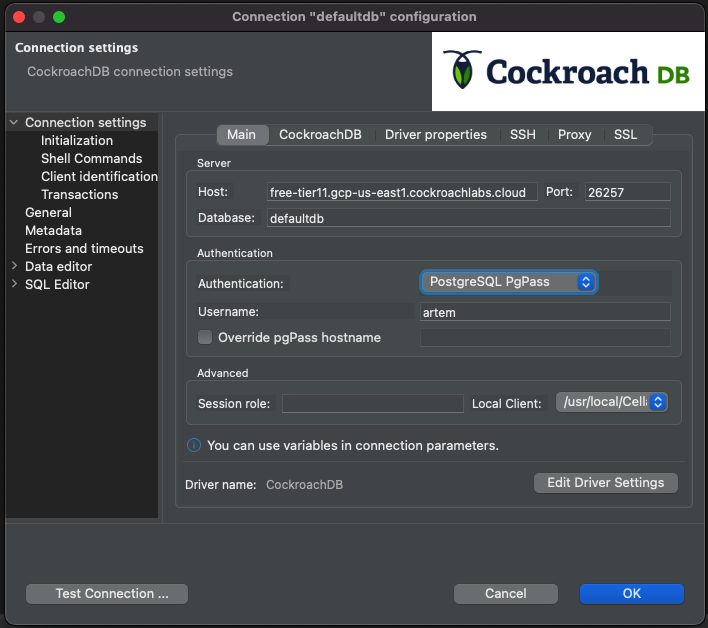
We can reconfigure the connection to leverage pgpass instead of "Database Native" auth method. Click into the field and switch to "PostgreSQL PgPass" next to the Authentication:
Now lastly, make sure you have pgpass configured correctly, we've covered it multiple times and it should be second nature by now. I'll include the sample file format for posterity
free-tier11.gcp-us-east1.cockroachlabs.cloud:26257:defaultdb:user:password
Finally, in DBeaver, click "OK" and you will be prompted to re-connect. Click yes.
Important, if you get an error with no match in pgpass
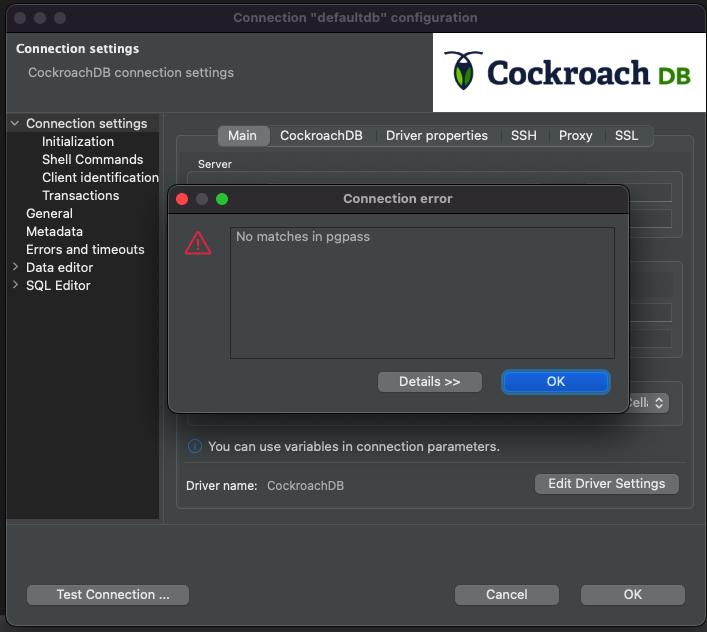
make sure your database in pgpass file matches the database in DBeaver
should match defaultdb in pgpass
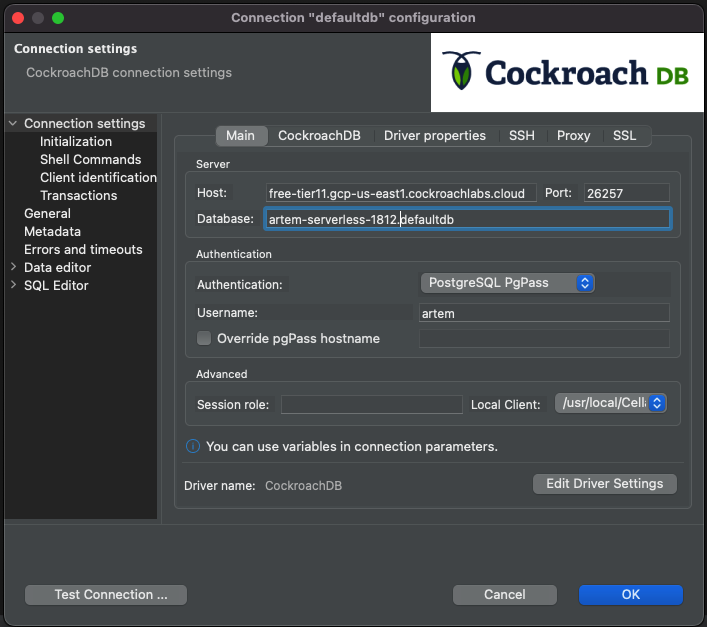
should match artem-serverless-1812.defaultdb in pgpass, i.e.
free-tier11.gcp-us-east1.cockroachlabs.cloud:26257:artem-serverless-1812.defaultdb:user:password
Now very important, irrelevant of how you've configured the database name, pgpass expects that the options field in the Driver properties is populated. I've not found a way yet to omit the options field and make routing work.
Finally, you can test the connection or click OK to close the context menu.
You're now all set to use pgpass with DBeaver.

Comments